
~We use gel electrophoresis to verify our success of DNA extraction and PCR amplification~
DNA Ladder & Negative Controls
It is important to load the gel with a ladder to be used as calibration for estimating the size of DNA fragments. DNA ladder is a solution containing many DNA molecules of specific known lengths. We also typically use a negative control in one well to test for contamination. DNA samples are absent in a negative control, which is composed of water, buffers, and primers. Visualizing bands in the negative control well indicates contamination of the samples. Ideally, the negative control lane will not show any bands.
Does size matter?
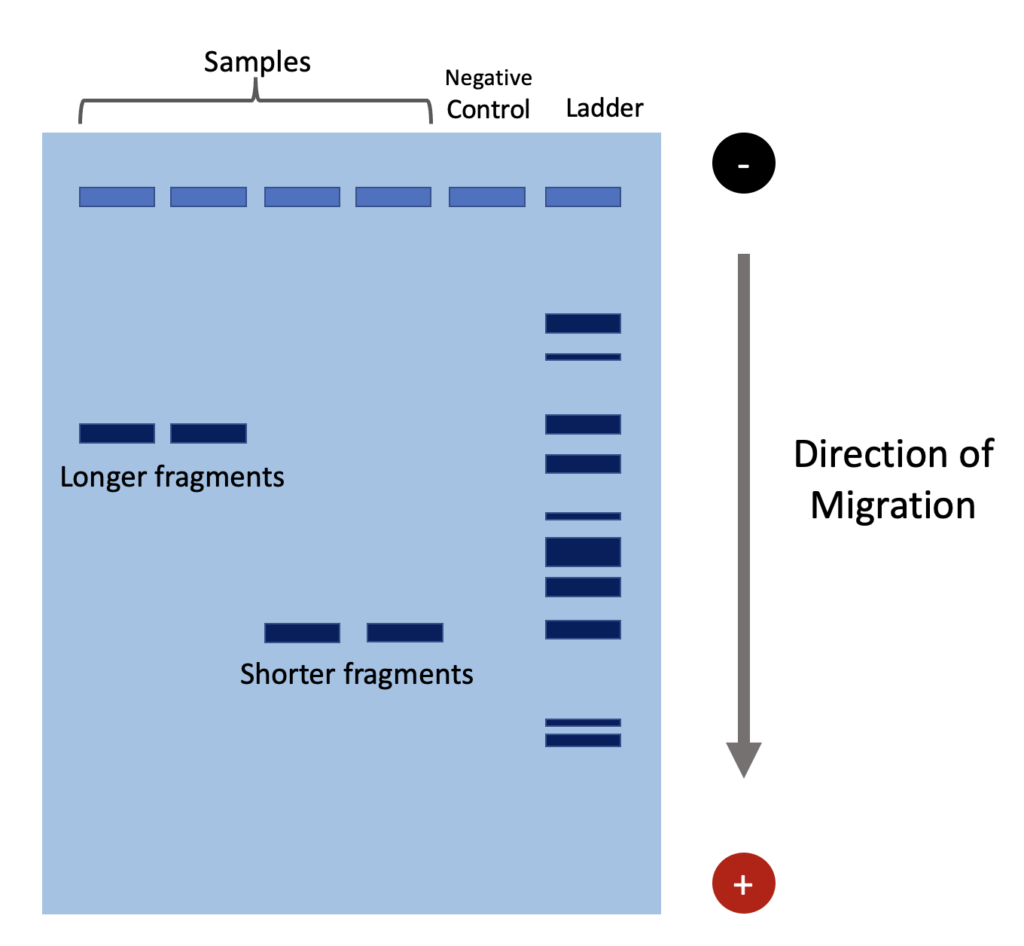
Gel electrophoresis works because DNA is negatively charged, due to the presence of phosphate groups in its backbone. Samples of PCR product are loaded into wells in the gel near the negative node. Due the the electric current across the buffer and gel matrix, DNA fragments migrate towards the positive node and separate by size. DNA fragment size determines the speed at which it travels. Larger DNA fragments move slower and thus end up closer to their original wells. Conversely, smaller fragments move faster and farther.
UV Visualization of Bands
We use two kinds of dyes to stain the samples. One dye can be seen under normal lights with the unaided eye and appears blue, indigo, or green in color. The second dye can only be visualized under UV light. A historically common UV-visualized dye is ethidium bromide. While this is effective in binding to DNA for UV-imaging, it is a known mutagen and highly toxic so must be handled with care. We use GelRed, which is a safer alternative.
Once the check gel is run, the stained agarose gel must be imaged under UV light to fluoresce the GelRed dye. The intensity/brightness/strength of the bands under UV light is an indicator for sample concentration. Sample concentration refers to how much DNA is present in each band. We hope to see bright bands in the expected locations. Bright bands indicate amplification success while faint bands indicate a low concentration of DNA. This low concentration can be concerning and can be caused by any prior step. Possibly the original sample did not have well preserved DNA, or the extraction step was unsuccessful, or the amplification failed, or the sample was not properly loaded into the gel.
We often see a faint band that lies much closer to the wells than we expect for our target DNA fragments. This is usually the result of primer dimerization. We use specific primers designed to target specific DNA barcode regions. Sometime, there is a higher concentration of primers than is used during PCR. This can happen due to degraded DNA sample, failure of amplification, not enough cycles of PCR, or simply too much primer added to the master mix initially for the PCR reaction. We always try to optimize our protocols for maximum efficiency without sacrificing accurate data.